


Introduction
This article is going right back to basics, we are going to build a Domain Controller for use in a Hyper-V lab. Then we will Add some user accounts and domain join a client PC for use on our domain. I will be using Windows 10 Pro and Windows Server 2022 for this article
What you will need
- Copy of Windows Client (Pro/Enterprise) .ISO
- Copy of windows Server .ISO
- Windows client Pro/enterprise edition (for access to Hyper-V) -Install Hyper-V (Additional Features)
- 2 Virtual Machines, one with Windows Client installed and one with Windows Server installed
This article presumes you have already installed Hyper-V on your Windows client machine and have configured any virtual switching required for Internet access to your VM environment and you understand how to build a VM shell and install Windows Server.
Steps for building the Domain Controller
- Rename the server
- Give the server a Static IP Address
- Install Active Directory Domain Services & DNS
- Promote the Server to a Domain Controller
- Create a test user account
- Create an account for use as Domain Admin
Steps for configuring the Windows Client
- Rename the client
- Give a static IP address and DNS address of our DC
- Domain Join the Client to our new Domain
- Login with our test user account
Building the Domain Controller
On your shiny new Windows Server open Powershell as administrator, we will here rename the computer, give a static IP address and DNS of itself (for now) and install AD-Domain-Services and DNS roles. We will then restart the computer.
#Rename Computer
Rename-Computer -NewName DC01

##Apply IP/SubnetMask/Gateway
New-NetIPAddress -InterfaceAlias Ethernet -IPv4Address 10.0.0.1 -PrefixLength 24 -DefaultGateway 10.0.0.254

##Set DNS Address
Set-DNSClientServerAddress -InterfaceAlias Ethernet -ServerAdresses 127.0.0.1

##Install AD-Domain-Services and DNS
Install-WindowsFeature -Name ad-domain-services, dns -IncludeManagementTools

##Restart Server
Restart-Computer
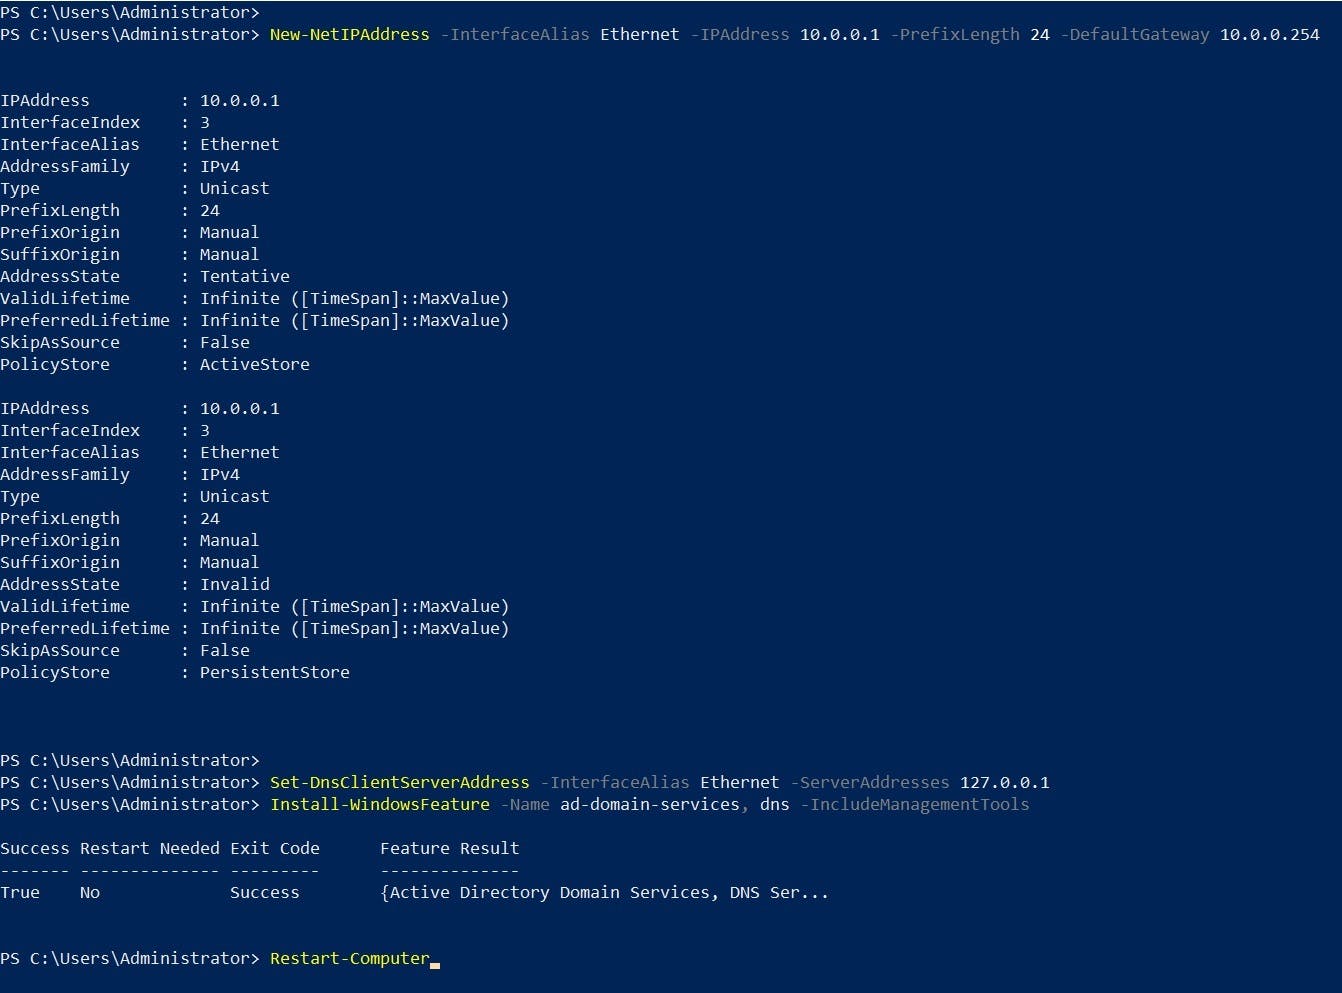
Tip: If you have more then one NIC on your VM use "Get-NetAdapter" to view Adapter index and name.
Once your server has rebooted we will now promote it to a Domain Controller, open up Powershell as an administrator again.
##Promote to a Domain Controller and create Domain
Install-ADDSForest -DomainName switchitup.tech
You will be prompted to enter a DSRM Recovery password, should you ever need to troubleshoot and fix domain errors you will need this password to enter DSRM recovery mode. This can also later be changed via the NTDSUTIL.EXE command line.
After entering the DSRM password twice it will then prompt you are about to promote and the server will restart. Say YES to ALL.
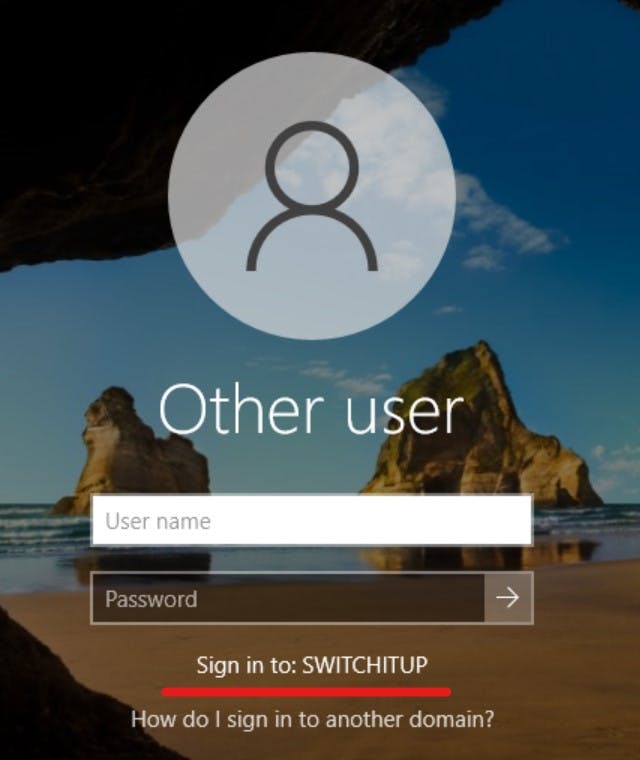
On reboot you will have a shiny new Domain Controller, notice we can now sign in as a domain account on SWITCHITUP
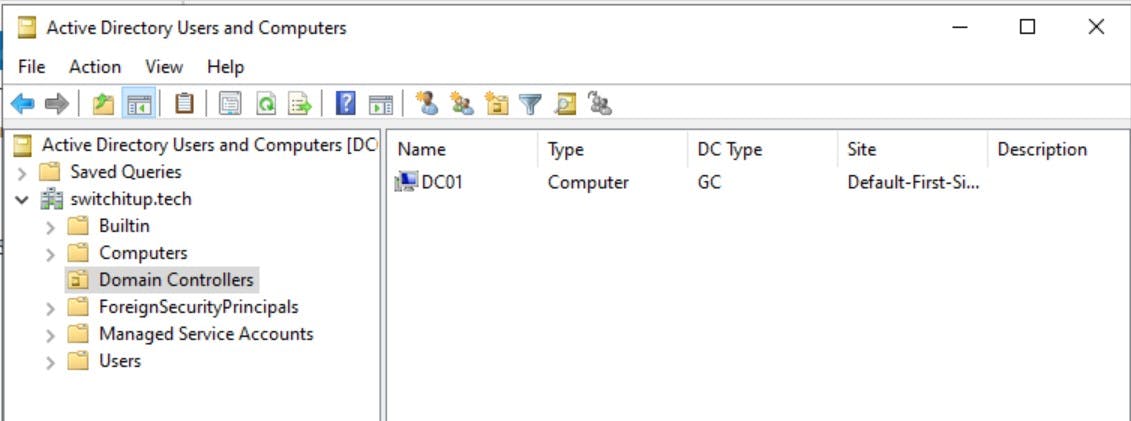
Lets take a brief look at Active Directory Users and Computers, here you will find the base structure and our new DC01 computer object under the "Domain Controllers" OU (Orgnaisational Unit).
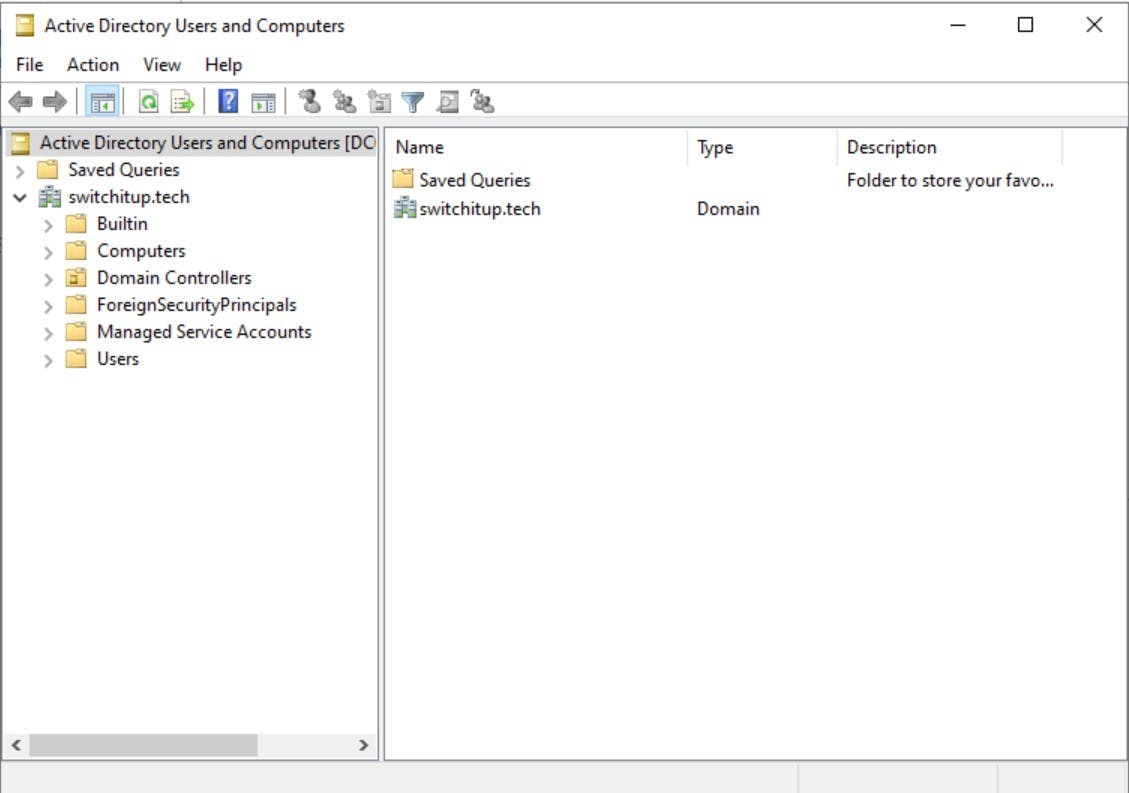
Normal practice is to restructure your Organisational units to separate your Domain users OU from all the built in user accounts: You might create a "" OU with another "Users" OU within. This is also important when applying Group Policies. Group Policies applied to the OU will effect all accounts/Objects within that OU which you might not want. But i'm going to be lazy and use the existing "Users" OU which will suffice for what I need.
Fire up Powershell as an administrator again, we will create a user and join him to Domain Admins Group.
##Create User
New-ADUser -DisplayName 'Ash Roberts' -name 'Ash' -GivenName 'Ash' -Surname 'Roberts' UserPrincipalName 'ash.roberts@switchitup.tech' -SamAccountName 'ash.roberts' -AccountPassword (ConvertTo-SecureString -AsPlainText "Password1" -force) -Enabled $True -ChangePasswordAtLogon $False

##Add to Domain Admins
Add-ADGroupMember -Identity 'Domain Admins' -Members ash.roberts
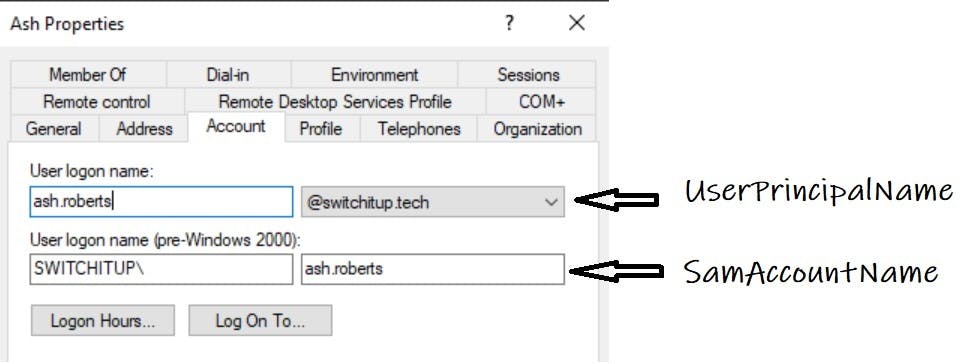
-Display Name = Name user sees at login
-Members = SamAccountName
UserPrincipleName = See Screenshot
SamAccountName = See Screenshot
Tip: If you do not enable the account the account by default is disabled!
Lets create user two:
##Create user 2
New-ADUser -DisplayName 'Hilton Roberts' -name 'Hilton' -GivenName 'Hilton' -Surname 'Roberts' UserPrincipalName 'hilton.roberts@switchitup.tech' -SamAccountName 'hilton.roberts' -AccountPassword (ConvertTo-SecureString -AsPlainText "Password1" -force)
##check user status
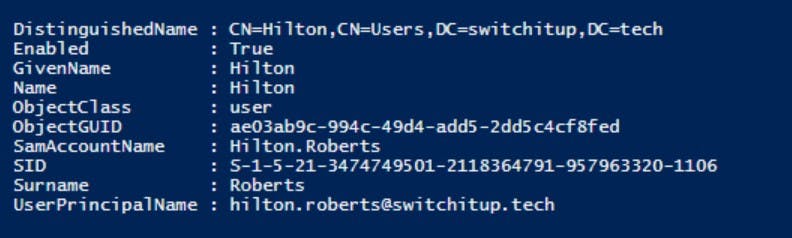
Get-ADUser 'Hilton.Roberts'
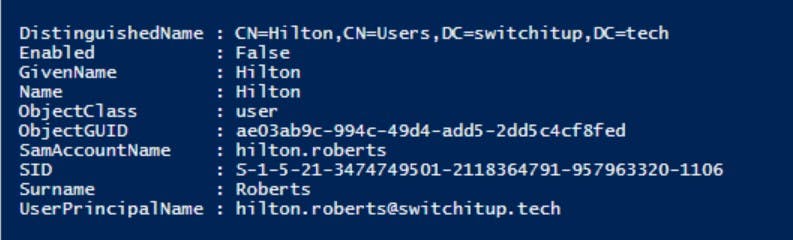
Notice Hilton is disabled because we did not enable his account at creation, lets enable him:
Set-ADUser -Identity hilton.roberts -Enabled $true

Get-ADUser 'Hilton.Roberts'
Now lets move onto our Client configuration, Hint! its the same PowerShell commands for general setup as we used for our server.
Client Configuration
#Rename Computer
Rename-Computer -NewName WIN10-01

##Apply IP/SubnetMask/Gateway
New-NetIPAddress -InterfaceAlias Ethernet -IPv4Address 10.0.0.10 -PrefixLength 24 -DefaultGateway 10.0.0.254

##Set DNS Address
Set-DNSClientServerAddress -InterfaceAlias Ethernet -ServerAdresses 10.0.0.1,8.8.8.8

##Restart Server
Restart-Computer
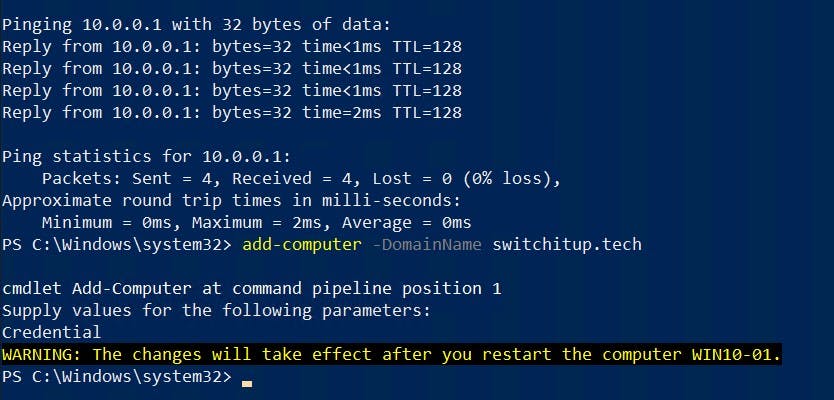
Now we will add the machine to the Domain which is simple:
##Add Client to the Domain
Add-Computer -DomainName switchitup.tech
#Provide credentials when prompted#

#Restart Computer
Restart-Computer
You will be prompted to provide credentials to join it to the domain. Ash Roberts can do this as he is a domain admin or use the administrator account you created your DC with.
TIP: This step usually fails if you cannot get to the DC, make sure your DNS is correct and you can ping the DC. Notice I verified my connectivity before I attempted to Domain Join my client.
If you log back into your DC and open "Active directory Users and computer" and browse to the "Computers" OU you will see your client machine computer object.

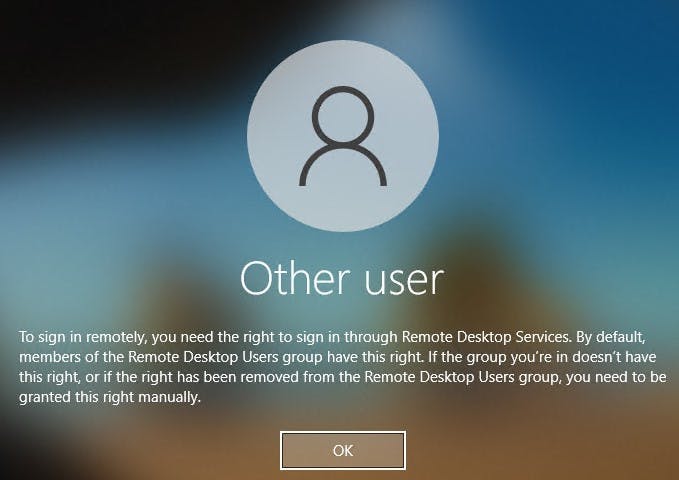
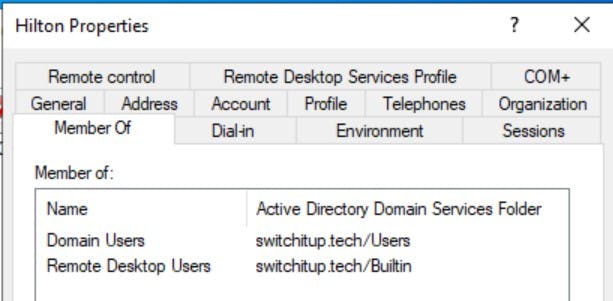
You will now be able to log in with your domain accounts you created earlier. Because you are using a form of remote conneciton to the VM you may need to add your users to the Remote Desktop Users Group
EXAMPLE:
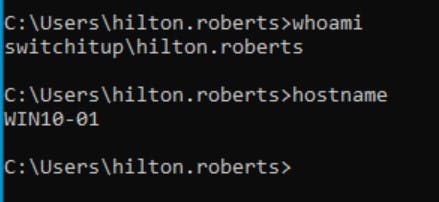
Finally Hilton can logon:
Summary
We have learned how to create a domain controller on Windows Server, General Server basic configuration and user creation in Active Directory. We have also learned how to join our client machine to the domain and login with our domain accounts.
Even better we have done it in PowerShell in a matter of minutes!
Hope this article has been informative, see you soon.